Shallots are a member of the onion family, they
taste like onions but have a milder flavor. They are nutrient dense
and contain more flavonoids and phenols that other members of the onion family.
They are not only delicious but are easy to grow in your garden. In today's post we look at how easy it is to grow shallots in containers.
 |
| Growing Shallots In Containers |
Planting
We planted our shallot sets, the dutch yellow variety in February for a late summer harvest. Alternatively you also can plant
your shallots early fall in the month of August/September for an early spring
harvest, if winters in your area tend to be mild.
Before planting your shallots, you should prepare
your container or raised bed by using soil which is well draining. We used a
potting mix with some peat moss, perlite, worm castings and manure to provide
shallots a rich medium to grow. Plant the shallot sets in full sun in soil with
a neutral pH. Shallot sets are readily available in your local garden store
from late winter to early spring.
 |
| Planting Shallots |
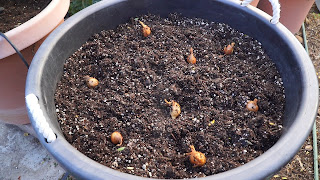
We used a
rope bucket wide enough to plant 8
bulbs, place them all around the container allowing sufficient space between
each bulb. Push the bulb in a little bit, not too deep so the tops are barely
visible. If you plant your shallot sets too deep you might end up with more
greens and smaller to no bulbs. Also make sure you are not planting and growing
shallots in an area where onions or shallots were grown in the previous season.
Around mid March, 27 days since planting the
green shoots look longer and vibrant and you will notice that out of the 8
bulbs that we planted only 5 of them germinated and grew well. At this stage
you can transplant your plants if you wish to.
In April, 55 days into the growing season, the
shallot plant looks strong and the greens continue to grow dense. The leaves of
shallots are edible and can be harvested, chopped fine and added to flavor your
soups and dishes.
 |
| Shallots growing well |
Around the end of June, 131 days since planting
the greens have grown to the full potential, the plant will now devote all its
energy into developing good bulbs. If you wish to you can side dress with a
fertilizer at this stage so they produce nice bulbs. Also you need to water your
plants very well. During hot summer make sure your plants get enough water as
shallots are shallow rooted and in order for them to thrive they need
sufficient water. So establish a good watering schedule.
In July, 150 days since planting you will notice
that the tops are becoming yellow and slightly shriveled. One week before this
stage stop watering the plants or at least reduce watering the plants till the
time the bulbs are ready for harvest. In a week your bulbs would be ready for
harvest, shallots are bunching onions that typically produce 5-7 small bulbs
per plant.
 |
| Harvesting Shallots From a 5 Gallon Pot |
Shallots are very expensive in the grocery stores
and since they are so easy to grow, you should try growing them in your garden.
Curing is a very important process for onions and
shallots. If you plan on harvesting and using them immediately then you are
fine but if you plan on storing them then you need to cure the shallots. Leave
them in the sun for a week for the tops and bulbs to dry and then let them cure
in an open, ventilated space for up to a month. Keep them dry and out of sun during this time. The
curing will mellow the flavor and increase their storage life. Once cured,
store them in mesh bags in a cool place with good air circulation.
 |
| Curing Shallots |
Shallots are used in fresh cooking and can be
made into pickles. Finely sliced, deep fried shallots are a delicacy in certain
cuisines. We absolutely love to grow and eat shallots.
Labels: curing shallots, growing shallots in containers, harvesting shallots, how to grow shallots, onions, rope bucket, shallots


